• About
  • Projects
  • Articles
  • Contact

julielivingstone

~ It isn't always about getting what you want. Sometimes it's about wanting what you've got.

julielivingstone

Tag Archives: sewing

Sewing as Therapy

22 Sunday Jul 2018

Posted by julielivingstone in Uncategorized

≈ Leave a comment

Tags

creativity, design, embroidery, machine embroidery, sewing

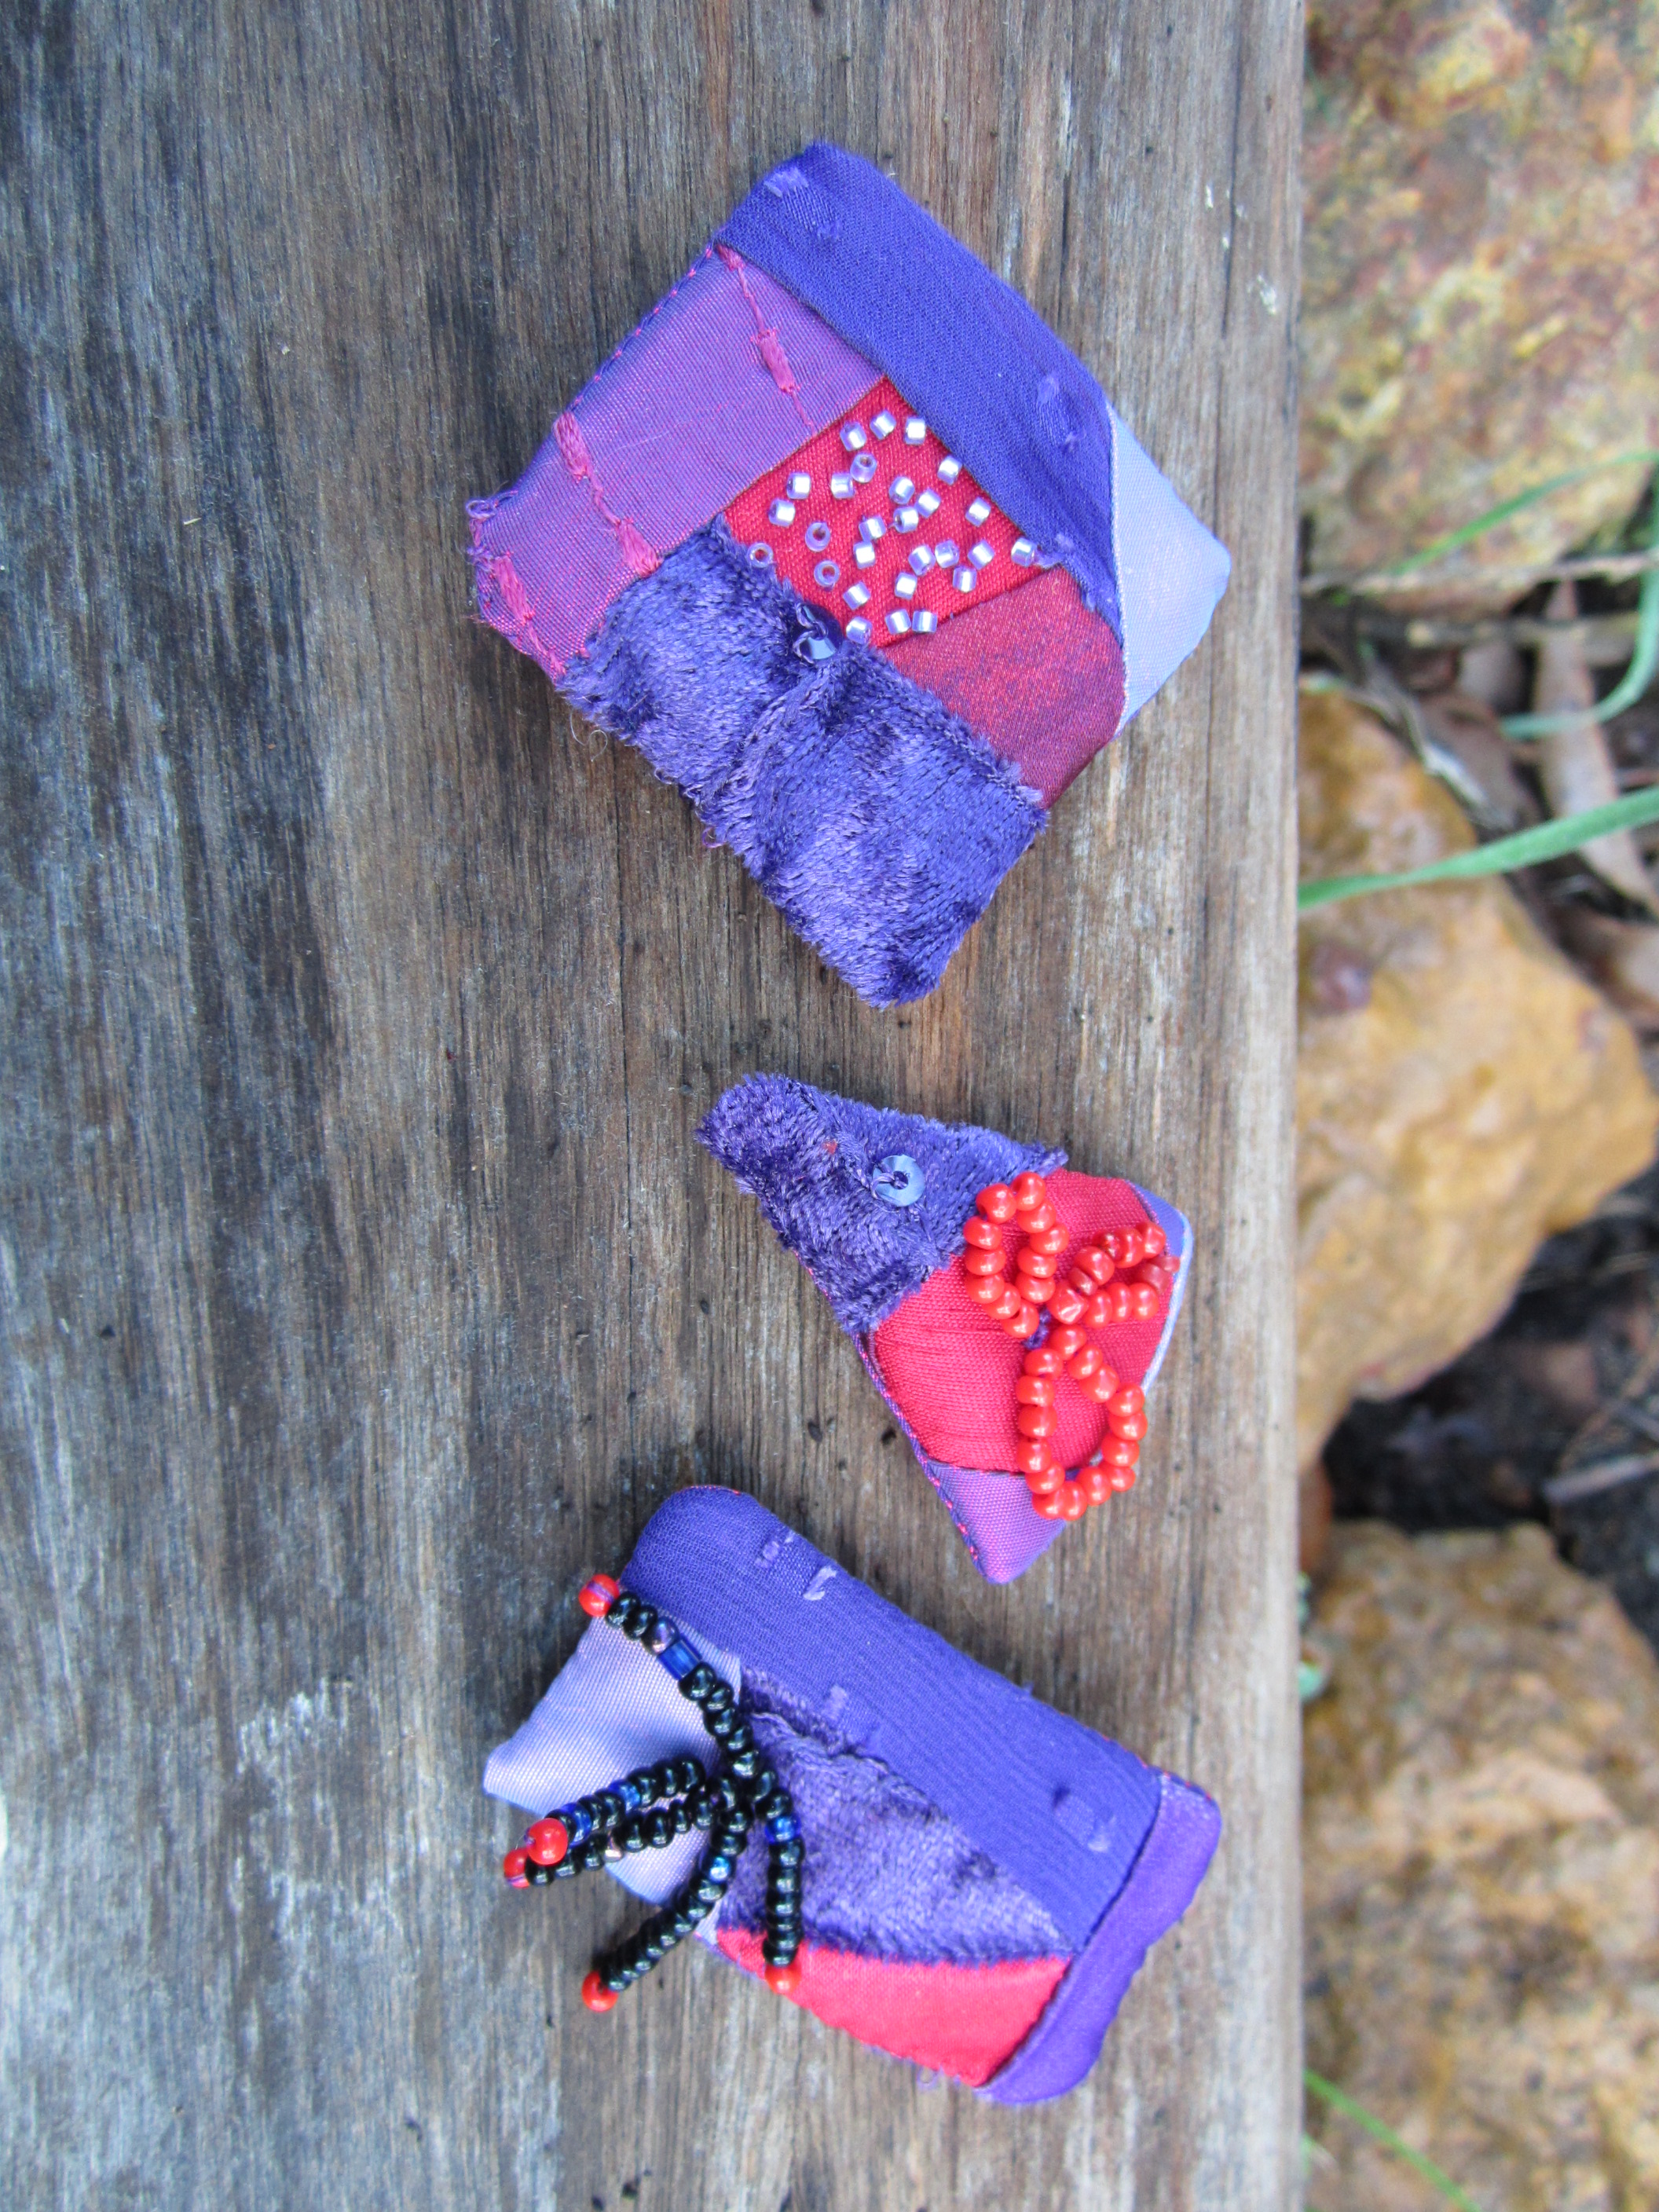
Embroidered beads in the making

Yesterday I went to a meeting of the WearTo? Group of the WA Embroiderers’ Guild, and tried my hand at making beads from fabric. I’ve seen this done before, and the results can be fantastic, mine have a little way to go! The idea is to embellish small strips of fabric with either hand or machine embroidery, then glue them on to strips of felt which are then rolled up to form tube beads. I started with some small odd shaped scraps and stitched them together crazy patchwork fashion first, then did some embroidery. That was as far as I got, I need to get some felt, and possibly figure out how to make the beads without glue, when I try to glue things I’m generally not very successful. All in all a fun day, and very different from the useful and rather mundane shopping bags I have been making lately.

I got to thinking on the drive home about creativity as therapy. The others in the group are all ordinary people, with the difficulties and challenges that we all face, but it seems that we all put those things aside for a few hours to focus on being creative, and taking some time for ourselves. As a result, there is lots of positive energy in the room, and that can’t be a bad thing.
I have to admit that what I’m going to say now can be applied to other creative arts, painting, knitting, woodwork, making music or model aeroplanes, but sewing is my thing so that’s what I focus on.
I believe sewing can be therapy, and it seems plenty of other people feel the same. Sewing and other creative pursuits have been shown to reduce stress, increase positive feelings, improve immune function, and even to protect the brain from diseases like Parkinson’s and dementia. When you are absorbed in creating something there is less room in your consciousness for negative or depressing thoughts. When you learn how to do something new you improve communication between different parts of the brain and may also improve the function of your memory. When you succeed in creating something you receive a boost to your self-esteem. When you wear something you have made and somebody compliments you on it the boost is even bigger. When you make something beautiful for yourself you are nurturing yourself, and we can all use some nurturing. When you make something beautiful for somebody else you are nurturing them and strengthening your relationship.
I don’t need to go on, do I?! Sewing is a great hobby (which is not to say that it’s better than any other creative hobby), but I and so many other people I know get wonderful satisfaction out of being creative and making something from fabric and thread. What are your thoughts?

Advertisement

Share this:

  • Twitter
  • Facebook
  • Email

Like this:

Like Loading...

Tilted Star – a quilt for a new family member

12 Saturday Aug 2017

Posted by julielivingstone in Uncategorized

≈ Leave a comment

Tags

design, quilting, sewing

I don’t consider myself a quilter, I’m not nearly passionate enough about it for that, but I have been known to knock out the odd quilt when a special occasion demands one. Major birthdays, weddings and so on. So a quilt was definitely required to mark the arrival of an addition to the family.

I picked up a couple of books from the library with fairly modern designs, and settled on a ’tilted star’ block from a book called Vintage Quilt Revival by Katie Blakesley, published by Interweave.

I knew the nursery colour scheme was to be grey with touches of yellow and aqua, so I raided all the local fabric shops for those colours in prints vaguely suitable for a baby, along with a backing, border and white for the ground around the stars. I was quite pleased to find the white, since it has little baby feet printed on it, they are also white so don’t show up unless you look really closely, but I felt it was a nice touch.

The book suggests making this blog using a paper template and foundation piecing, but I looked at the design and decided that I could do it by cutting shapes and stitching them together, and it would be simpler. I’m guessing that the suggestion to use foundation piecing came about because lots of the joins are on the bias, and using paper adds stability and helps to stop stretching. However, by being careful and using the walking foot on my machine I managed to do a reasonable job. Some of the points of the stars don’t quite line up with edges of the squares, but the inaccuracies are within my tolerance range.

Quilt detail

One thing I did, which would have been less likely if I’d done foundation piecing, was to cut quite a few of the triangles the wrong way round. Some of them are symmetrical, and it didn’t matter which way round they were, but the longer ones are asymmetrical, and I have quite a few left over which I couldn’t use because I had cut them wrong. Also, because I bought more fabric than I needed, I have added to my stash of quilting fabric yet again!

I also changed the design a little, deciding to add sashing in between each of the blocks to make the stars more distinct, as otherwise I felt they all ran into each other rather.

Tilted star baby quilt

Since piecing the front of the quilt was quite complicated, I decided to make the quilting itself simpler (just to make things easier for myself really). I chose a cotton batting, which needed quilting only every 6 inches or so, so my quilting design is just freehand wavy lines drawn along the length of the quilt, about 3 or 4 inches apart. That part of the project went very quickly, and I think it looks good.
I wanted a wide binding for this quilt, I think that frames the quilt nicely, but in the past when I’ve tried I’ve got into real trouble with mitering the corners. This time I found a tutorial on Youtube which explains it well, the secret is that you need extra fabric to allow for the width of the binding. Sadly I can’t now find the tutorial, but I did take one photo to remind myself of the technique.

Quilt binding detail

Finally, I added a label to the back of the quilt, with the baby’s name, date of birth, and other details. I think it’s really important to add this information to quilts since it’s an important historical record for so many antique quilts, although I must admit that in these days of digital photos, social media and other information sharing and recording methods, it might be a bit of an anomaly. It makes me happy anyway, how about you?

Share this:

  • Twitter
  • Facebook
  • Email

Like this:

Like Loading...

Origami Pockets

13 Tuesday Jun 2017

Posted by julielivingstone in Uncategorized

≈ Leave a comment

Tags

design, fabric, origami, pocket, sewing

I’ve always been intrigued by the idea of origami using fabric instead of paper, it’s just one of the many things I plan to explore further one day when I have more time. (I’m not sure when that day will come, but never mind!) So at a recent meeting of my neighbourhood group of the Australian Sewing Guild I took the chance to make a sample origami pocket.

Actually, as folding fabric goes, this is pretty simple. Check out the work of a guy called Jeffrey Rutzky, author of the books Shadowfold and Kirigami. I couldn’t find his website, perhaps he doesn’t have one, but there are plenty of images of his work online and they are amazing.

Our pockets were basically a welt pocket with a triangular opening, and three lips to fill that opening, all different shapes and angles. Mine looked like this:

Origami pocket sample

I wasn’t careful enough about the placement of the pieces, not realising at the time how important it was, so mine has a hole in the middle, all of the lips should actually meet. But, I could turn this into a design feature by making my pocket bag to go behind it from some contrasting material, and make it look as if it was intended to be that way!

I did a quick Google search but I couldn’t see a tutorial for making these particular pockets. I think originally they may have been in a Threads magazine article. There is a YouTube video of a guy called Arif Khan making what looks roughly like the same thing, only he uses knit fabric, which I think adds another layer of difficulty. There are also lots of other ideas for decorative and original pockets, room for yet more experimentation and play. What’s your favourite?

Share this:

  • Twitter
  • Facebook
  • Email

Like this:

Like Loading...

The Refashioners 2016 Community Challenge

22 Thursday Sep 2016

Posted by julielivingstone in Uncategorized

≈ 8 Comments

Tags

clothes, competition, denim, reconstructed, recycled, sewing, shibori

I was really excited when a friend sent me a link to the Refashioners 2016 Community Challenge being run by Makery. So much creativity, not to mention some fantastic prizes. Since recycling denim is my thing, I was quick to check out the details, and equally quick to decide to enter. At this point I must admit that I didn’t make this garment specifically for this challenge, it was one of my entries in the Australian Sewing Guild’s Castaway to Couture competition earlier this year.

Since I have done several denim recycling projects before I have a dedicated box full of discarded denim, both whole garments which I haven’t taken the scissors to yet, and bits left over from previous projects. For this challenge I decided to re-visit a theme I have used before, which entails many hours with a seam ripper. I find the most interesting bits of old denim are the bits which have faded, hems, seams, waistbands etc, anywhere the denim has been folded or creased. The fading creates beautiful patterns in the fabric, reminiscent of Japanese shibori dying.

The downside of all this beauty is that it only happens where the denim has been folded. Whilst the rest of the jeans are attractive, the best bits to me are generally small, so it means lots of unpicking to harvest them, and then lots of patching together to make a new garment. I think it’s worth it though, what do you think?

I seem to have been so caught up in the creative process for this challenge that I didn’t taken many photos of the work in progress. There is a pile of bits left over –

img_4787
Still raw materials for a few more projects here!

Then a few details of the finished garment –

img_4156
img_4161
img_4162
img_4165

The lining, which you can just see, and which saved me from having to finish all the seams, was a sundress from the op shop.

And finally me modelling it.
j-livingstone-denim-vest

Share this:

  • Twitter
  • Facebook
  • Email

Like this:

Like Loading...

Pants Fitting, and a Light Bulb Moment

31 Wednesday Aug 2016

Posted by julielivingstone in Uncategorized

≈ Leave a comment

Tags

Australian Sewing Guild, fitting, jeans, pants, sewing, workshop

At a recent neighbourhood group meeting of the Australian Sewing Guild we worked on fitting pants, assisted by I* and K*. I think this would have to be the most difficult garment to fit, you are trying to get flat fabric to go round the body at a part where one cylinder (the trunk or torso) splits into two cylinders (the legs), all the time allowing enough room for movement but in most cases still having a reasonably fitted profile. I know that I’ve tried in the past, and whilst I’ve had some successes I think they are outnumbered by the failures, to the point where I’d pretty much given up trying. Fortunately I’m usually able to buy pants that pretty much fit, so I’ve focused my sewing on less frustrating garments.

Since there was a pant fitting workshop on offer though, I decided to take up the challenge again. I needed to make a muslin to take to the workshop, so I dug into the stash for some fabric which I hoped would make a wearable muslin. I found a large piece of denim left over from making jeans for my daughter about 12 or 14 years ago, and decided to use that. It’s a fairly heavy weight denim with a white pinstripe woven in, which meant I didn’t need to mark grain lines on the muslin but could just work with the stripes on the fabric. In the end there wasn’t quite enough, I had to use scraps of other denim for the waistband, but that was OK.

I selected a Sandra Betzina Today’s Fit pattern, (number 7608), which I had made before without success. The result of that effort is still in my possession, but I don’t think I ever wore them, they were too baggy. I don’t remember where or when I bought the pattern, I don’t think it is in the current range, it’s reviewed here on sewing.patternreview.com

Having done another workshop earlier in the year with K* about accurate measuring I reviewed which size to cut, and ended up with a smaller size than I had done before. I haven’t lost weight, but I must have allowed too much ‘just in case’ fabric last time, which is probably why the pants were baggy. This time I cut according to my measurements, and basted the pants together ready for the workshop.

When I tried the pants on they weren’t too bad, but still baggy round my thighs, particularly at the back. I* advised me to undo the inside leg seam, and take in the seam allowance on the back of the pants between the crotch and knee. I took in about 1.5cms, and restitched, which was a great improvement. I had already shortened the pants by about 3cms at mid-thigh level, since they would be too long otherwise. If shortening pants you need to do it in the leg rather than just cutting off the bottoms, otherwise the width that is intended to fit round your upper thigh just ends up round the lower thigh, and is another cause of bagginess.

There was still room for improvement, but I was happier with the pants than I had been before, and since I had taken my machine with me I had started to turn them into a real garment rather than a muslin. I was still pondering the slight bagginess around the crotch on my drive home, and then there came a light bulb moment. I remembered reading, I think it was in Threads, an article about pant fitting which talked about body space. Basically you need enough space in the crotch curve to fit your body (obvious, right!), but if the crotch is too low/baggy, while it seems as if you have too much fabric, in fact you don’t have enough. More fabric, in the form of a longer inside leg seam and a higher crotch curve, means that the crotch seam fits more closely to your body. It’s the same principle as an armhole, in order to have a fitted armhole which comes closer to your body, you need to raise the bottom of the armhole, which means you need more fabric.

When I got home I went straight to the sewing machine, and restitched the crotch seam with only the minimum seam allowance, about 3/8″. Tried on again, and another improvement in the fit! Unless I take the pants apart again and add on some more fabric, then re-cut the seam line, this is the best I can do, but I’m happy enough. When I make the pattern again I will raise the crotch seam more and see what happens.

I’m so enthusiastic now about these pants that I have finished them, and they will definitely be a wearable muslin. I had to face the bottoms, since I had only the very minimum of fabric to make them and no hem allowance, plus the waistband is in a different denim, but since I don’t wear my tops tucked in that won’t matter. I’m even going to drag my previous effort out of the cupboard and see if they can be resuscitated.

Again, no photos for this post. At this time of year the only time I am home in daylight is at the weekend, and the last couple of weekends have been very overcast so no sunshine for taking photos even then. I am spoilt really, so much of the year is bright and sunny and so I just assume that I can take photos outdoors, but lately it hasn’t been happening. The forecast for this weekend is better, I must make time to go out with the camera and photograph a few projects that haven’t yet been recorded.

Share this:

  • Twitter
  • Facebook
  • Email

Like this:

Like Loading...

New from Old – Jumper Wrap Workshop

22 Monday Aug 2016

Posted by julielivingstone in Uncategorized

≈ Leave a comment

Tags

ASG, jumper, recycling, sewing, workshop

Yesterday I attended a workshop at my neighbourhood group of the Australian Sewing Guild run by Jody Pearl of Sew Outside the Lines. Jody showed us how to make jumper wraps, using old jumpers sourced from the op shop or from our own stash. I had bought several garments to use in the workshop from the Good Samaritan op shop, but in the end only used two of them. I had selected a couple of grey to use as a base, and some pink for additional interest, but I ended up using only the grey to make a monochrome wrap. A bonus is that I now have the pink ones left over for another wrap, and now I have done one I also have more idea about what to look for when shopping for the raw materials next time.

The basic premise is to cut up the donor garments, and start by making a flat piece of fabric. A diagonal cut in the first garment means that some of the fabric is on the bias, which is what gives the wrap an interesting asymmetrical look, and also a bit of flare. After that the donor garments pretty much dictate how the finished item looks, as Jody says you let the fabric tell you what to do. Every finished garment is different, since the starting points are all different, and also everybody has their own individual style which influences the decisions they make.

I didn’t get mine quite finished, so no photo yet. I had forgotten to take a cushion, and I find the chairs in the centre are a little low, so after some time sewing my back was aching and I didn’t feel like finishing. I have a bad habit of disregarding my posture until something hurts, rather than sitting properly to start with, and I need to stop doing that. I have something called a ‘quillow’, which is basically a blanket/quilt which folds up and tucks into a pocket stitched on one side of it and becomes a cushion. I really only use it when I am going out somewhere, so I should keep it in the car and avoid the same thing happening again.

When I got home I was pressing my wrap to try and get rid of a small ‘bubble’ where I had stretched the fabric during stitching, and I noticed a pale streak in one of the pieces. I hadn’t noticed it before, but as usual with these things, it is right down the front of the garment, and once I knew it was there it bugged me. I’m not sure how it got there but I need to do something about it. The pressing didn’t work, but I did manage with a great deal of care to unpick that bit of stitching so that I can re-stitch it without the bubble. Unpicking knitwear takes a great deal of care, especially since I had used a closely matching sewing thread, but I did it without making a hole in the fabric. If I had made a hole though, I could just have stitched more fabric on top, such is the adaptability of the whole concept.

My first thought was to get some fabric paint and add more pale streaks to try and disguise the first one, but that meant going shopping for paint. Then I remembered that I had an offcut of pale grey lace somewhere, and thought of stitching that over the top of the panel with the streak. I’d also add at least one other piece of lace elsewhere to make it look as if the lace was intentional rather than covering up a flaw.

Apart from that I have just to finish the armholes and the wrap is complete – watch this space for a photo!


Share this:

  • Twitter
  • Facebook
  • Email

Like this:

Like Loading...

Slow Clothing

04 Thursday Feb 2016

Posted by julielivingstone in Uncategorized

≈ Leave a comment

Tags

clothes, reconstructed, recycled, sewing, upcycled

I don’t ‘do’ Facebook, but I do occasionally look at others’ pages, and something on the Australian Sewing Guild’s page caught my eye recently. It was called ‘Slow Clothing – 40 garments in 40 days’. Wow, I thought, if I made 40 garments in 40 days I wouldn’t call that slow! At my recent rate of progress 40 garments in 4 years would be more likely.

Of course, all was not what it seemed. The Slow Clothing Project is an initiative by a Queensland sewer (or maker, to use her term) designed to get people to think about where there clothes come from, who made them, and whether they really need yet another pair of jeans. It’s the antithesis of fast fashion, the current cult of buying the latest look, having a whole new wardrobe every season, a new dress for every party, and then just discarding stuff when it’s only been worn once or twice, or maybe even not ever.

The 40 garments will be made by 40 different people, a diverse batch of makers scattered around Australia. Using either cast off clothing, or fabric from their own stashes, they will refashion, recycle, upcycle, reclaim or rework the fabric into new garments. The intention is to demonstrate that even though something isn’t brand new, it can be a useful and stylish garment which can have a new life.

Apparently Australia exports 70 million kilograms of cast off clothing to the third world each year, and presumably other countries are on a par with that. Only 20% of the clothing in op shops actually finds a new home, so even if you give your unwanted clothes to the op shop you aren’t really helping the situation much. Not buying so many new clothes would be far better, and save you money!

I started shopping in op shops some time ago when money was short, and now I still do it, because I can find plenty of things to wear without contributing to the wasteful industry that is high street fashion. Some things I buy to wear just as they are, others get re-fashioned. I’ve recently been shopping for some garments to use for the Castaway to Couture competition, but even that gives me pause. I wanted about 5 garments to use to make my one entry, and I do feel uncomfortable about destroying 5 perfectly good pieces of clothing which somebody else could have bought and worn as they were, whereas I will only end up with one garment. With that in mind I limited myself to shopping for the items which were half price, since I am pretty sure that these are the ones which are destined to go to landfill next week, or shortly anyway. I’m quite happy with what I’ve got, now to start creating!

Share this:

  • Twitter
  • Facebook
  • Email

Like this:

Like Loading...

Castaway to Couture 2016

18 Monday Jan 2016

Posted by julielivingstone in Uncategorized

≈ 1 Comment

Tags

Australian Sewing Guild, Castaway to couture, competition, recycled, sewing

I was really excited to hear that the Australian Sewing Guild is running Castaway to Couture again this year. Last year was the first year of the contest, the idea being that you take a garment or garments from an op shop, and refashion it or them into something else. This is my entry from last year:

Jacket made from an Issey Miyake pattern out of cast off men's shirts

My entry in the Castaway to Couture competition

Last year the contest was run in conjunction with Red Cross op shops, and the almost hardest part for me was cruising round all the Red Cross shops in Perth looking for raw materials. None of them were very close to where I live! This year you can buy the original garments from any op shop, or indeed use something out of your own stash or wardrobe, which makes it easier. There are also two categories, the judges choice and the peoples choice, and twice the number of prizes. Seriously exciting! I already have some ideas buzzing around in my head, just need to find time to go shopping for the ingredients!

Share this:

  • Twitter
  • Facebook
  • Email

Like this:

Like Loading...

Using up the left overs

04 Monday Jan 2016

Posted by julielivingstone in Uncategorized

≈ Leave a comment

Tags

Australian Sewing Guild, charity, journal cover, project, sewing

A New Year. Classic time for plans, resolutions, reviewing the last year and considering what to change about the coming one. I’m not good at resolutions, not at keeping them anyway, but I can reflect and review with the best of them. Last year I did get quite a bit done, made some changes to the house, taught a sewing workshop (really keen to do more of that), did some sewing, but not enough. What am I going to change about 2016?

Definitely resolved to be more organised. And if possible to waste less time. Although it’s hard sometimes to define what is wasted time. Sitting in the garden with a good book and a cool drink is not necessarily a waste of time. Such moments are all part of a balanced life, and essential to one’s well being.

On the other hand, spending half an hour looking for some black elastic, and only being able to find white, even though I’ve looked in at least a dozen different spots where black elastic might be, is definitely wasted time. What am I going to do about it? Put down black elastic on my shopping list for one thing, and have a dedicated spot to keep it for another. Time wasting problem solved!

Part of my plan to be more organised, is using up some of the stuff I already have, instead of acquiring more. I have boxes and boxes of fabric, much of it scraps left over from past projects. I’ve always kept those scraps with the idea that ‘they’ll come in for something one day’. Well, the next 366 (2016 is a leap year) are the days that at least some of them are going to fulfill that destiny. I’m looking out for small projects that I can use them up in.

One resource I found is a charity called Angels for the Forgotten, one of a few listed on the Australian Sewing Guild’s website. There are a number of things they ask for, most of which can be sewn with only small pieces of fabric, so I will definitely make some of those. I have started with a journal cover, using three of my ‘come in handy’ bits. The girl in the 1950s dress on the front is cut from a slightly larger piece, I’m going to use the rest of it to make a pouch for feminine hygiene items. That should put paid to all of that fabric, and the plain red and some aqua coloured cotton I used for the lining are also left overs.

IMG_3929 IMG_3927

I got inspiration for the cover from two of the blogs mentioned on the charity’s website, but didn’t follow either of them exactly.

Ellison Lane

Bloom & Blossom

Share this:

  • Twitter
  • Facebook
  • Email

Like this:

Like Loading...

Projects Big and Small

06 Thursday Aug 2015

Posted by julielivingstone in Uncategorized

≈ Leave a comment

Tags

blogging, competition, hand made gifts, reconstructed, recycled, sewing, upcycled

Four whole months virtually, and no blogging. That’s just being really, really slack, and I have no excuse. So I’m not going to make excuses, but just carry on gracefully as if nothing had happened.

Recently I went to an 80th birthday party of a friend, and wanting to take a gift I made some more of the patchwork brooches or pins that I have made before. I’m not sure these were quite so successful, here they are. They are actually red and purple, but purple is really difficult to get right in photos.

Patchwork brooches or pins, red & purple

Patchwork brooches


I don’t know why, but they just don’t seem quite right. The triangle one is a little too small I think, and I just didn’t take enough care over the selection of the fabrics, and the placement of the pieces. However, they served their purpose.

I have several other projects in the pipeline, but definitely not in the blogging-about phase yet. However, I was very happy with my entry in the Australian Sewing Guild’s Castaway to Couture competition. The idea was to buy a garment or garments from a Red Cross opportunity or thrift shop, and recycle or upcycle it or them into a new garment.  This is my entry, and the others can still be seen on the Guild’s Facebook page here.

Jacket made from an Issey Miyae pattern out of cast off men's shirts

My entry in the Castaway to Couture competition


Until next time!

Share this:

  • Twitter
  • Facebook
  • Email

Like this:

Like Loading...
← Older posts

Blogroll

  • Learn WordPress.com
  • Live to Write – Write to Live

Back Pages

  • July 2018 (1)
  • November 2017 (1)
  • August 2017 (1)
  • June 2017 (2)
  • March 2017 (1)
  • October 2016 (1)
  • September 2016 (1)
  • August 2016 (2)
  • March 2016 (2)
  • February 2016 (2)
  • January 2016 (3)
  • August 2015 (1)
  • March 2015 (2)
  • February 2015 (1)
  • January 2015 (3)
  • December 2014 (2)
  • November 2014 (4)
  • April 2014 (2)
  • November 2013 (2)
  • October 2013 (1)
  • July 2013 (1)
  • June 2013 (2)
  • March 2013 (1)
  • February 2013 (2)
  • January 2013 (2)
  • December 2012 (3)
  • November 2012 (3)
  • October 2012 (4)
  • September 2012 (4)
  • August 2012 (1)
  • July 2012 (1)
  • May 2012 (1)
  • April 2012 (4)
  • March 2012 (2)
  • February 2012 (3)
  • January 2012 (3)
  • December 2011 (3)
  • November 2011 (5)
  • October 2011 (4)
  • September 2011 (2)

My Tags

Anthony Trollope Art Deco article ASG asymmetrical ATASDA Australian Sewing Guild blog blogging book books challenge Christmas clothes clouds colour commonplace book competition content craft creativity design dogs drawing electric embroidery fabric fashion illustration fence freelance Fremantle garden horses ideas inspiration in every issue Jeeves Koos van den Akker labrador language learning machine embroidery magazine Margaret Preston Mozilla novels op-shop origin of phrases pattern PG Wodehouse photography phrases project property quilting reading reconstructed recycled Roald Dahl sayings ScribeFire seo sewing skirt Threads magazine transfer dyes Tris Hussey TS14Plus upcycled water weather Wooster Wordpress words workshop writing

Blog at WordPress.com.

Privacy & Cookies: This site uses cookies. By continuing to use this website, you agree to their use.
To find out more, including how to control cookies, see here: Cookie Policy
  • Follow Following
    • julielivingstone
    • Join 36 other followers
    • Already have a WordPress.com account? Log in now.
    • julielivingstone
    • Customize
    • Follow Following
    • Sign up
    • Log in
    • Report this content
    • View site in Reader
    • Manage subscriptions
    • Collapse this bar
 

Loading Comments...
 

    %d bloggers like this: